Difference between revisions of "NVGate D-Rec"
| Line 65: | Line 65: | ||
4. Records setup management | 4. Records setup management | ||
Item #1 and #3 are exactly the same as the standard ASB dialogs for the channels connection and the recorder setup. Item #2 is also the same but only a subset of the events is handled by D-rec: Recorder trigger on Edge on Ext. synch, Level and delta level on DC inputs and periodic event only. | Item #1 and #3 are exactly the same as the standard ASB dialogs for the channels connection and the recorder setup. | ||
Item #2 is also the same but only a subset of the events is handled by D-rec: Recorder trigger on Edge on Ext. synch, Level and delta level on DC inputs and periodic event only. | |||
Item #4 allows managing the setups saved in the analyzer. The D-rec setups can be written, removed, imported and exported from this dialog box. | Item #4 allows managing the setups saved in the analyzer. The D-rec setups can be written, removed, imported and exported from this dialog box. | ||
Revision as of 15:52, 29 August 2024
'D-rec' option turns your analyzer into a true stand-alone recorder. You will be able to record raw signal data without PC.
D-Rec, Recording without PC overview
Hardware compatible : OR35TW-OR36TW-OR38TW(OR10 : Read Stand Alone page)
Licence : Optionnal, contact your local distributor.
With The D-rec option your analyzer is turned into a true stand-alone recorder able to face any field situation. With D-rec, the instrument is available from power-on to power-off without any PC or other fragile/complex consumer interfaces like PDA, smart phones and mini PC. Setting up the front end and the recorder is operated through the new bright display with its large buttons. This interface is adapted to many situations such as outdoor, sun light, wearing gloves, etc...
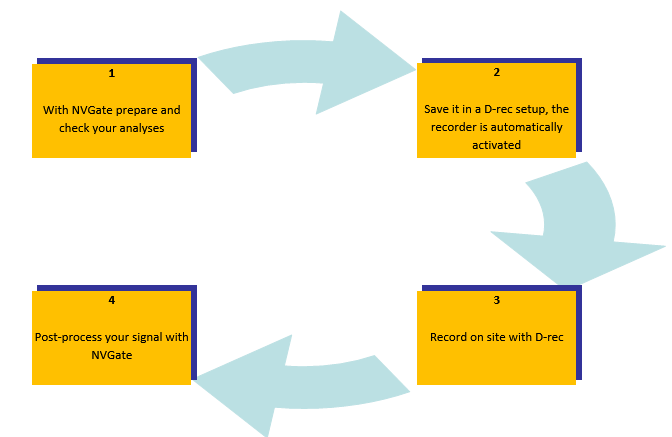
Using D-rec takes place in 3 different operations:
- Operating the recorder with the LCD panel,
- Preparing predefined setups through NVGate,
- Signal recovery with NVGate,
Part 1: recorder operating
The D-rec control is made through the analyzer LCD panel. The described menus are available on analyzers sold or upgraded with the corresponding option.
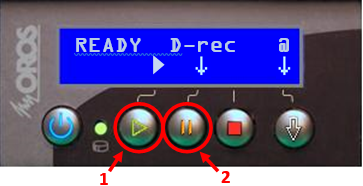
After powering on the instrument the LCD panel proposes to enter the D-rec operations. There are 2 possible modes: record directly or setup the recorder.
1. To record directly, simply press the run button with the green arrow. The analyzer loads the default setup and starts recording.
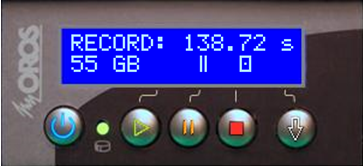
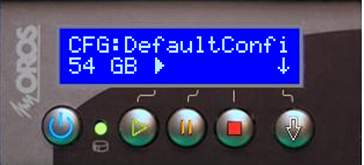
2. The setup name is displayed during the load. When recording the system displays the available disk space and recording time. The Run, Pause and Stop buttons control the recorder operations.
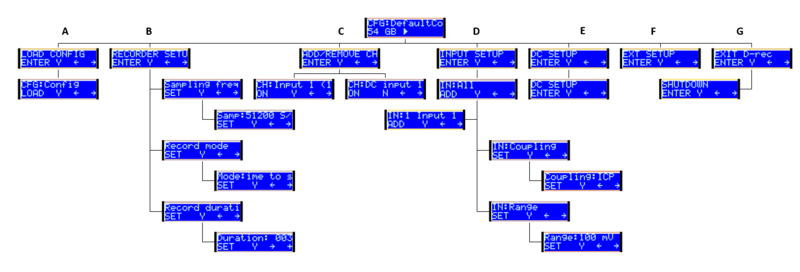
3. To setup the recorder, press the Pause button down to the D-rec arrow. The LCD will display a set of menus. The navigation is controlled by the Run, Pause, Stop and Down arrow buttons. Buttons actions are displayed on the LCD above the corresponding gray lines.
The recorder supports multiple records and sessions (Power On/Off). In case of unexpected stop (Power failure or Mobi-Disk removal during a record) the interrupted records are automatically recovered at the next power on.
The front end and recorder setup allows to:
- Load a predefined D-rec setup (also called configuration)
- Change the recorder setup: Sampling frequency, Mode and Duration.
- Enable or disable channels: Dynamic inputs (IN), parametric inputs (DC) and external synch. (Ext). Note that each input can be activated as a dynamic or a parametric channel.
- Modify the input settings: Coupling, range and Xpod conditioner.
- Modify the DC inputs range.
- Modify the Ext. synch inputs: Coupling and range.
- Exit the D-rec mode to start with NVGate or shutdown the analyzer.
For D, E, and F, the inputs modification can be applied to a group of inputs. In the first menu set the inputs you want to change to Y (or set All to Y to modify all inputs simultaneously). Then set the coupling or range for example. It will apply to all the selected channels.
Part 2: Preparing D-rec configurations with NVGate
The analyzer memorize up to 12 different setups that can be loaded on site, without a PC. A D-rec configuration concerns the front-end and recorder setup only. The configuration can be created in 2 ways: Setup the front-end and the recorder or let D-rec do it automatically from an existing analysis workbook.
Setup the front-end and the recorder
Run NVGate with your analyzer connected. A new item is available in the tabhome menu: D-rec…
From this menu entry NVGate will propose a set of dialog boxes that guide the user through the necessary settings to build a D-rec setup. The displayed dialogs are the following:
1. Channels connection
2. Event connections
3. Recorder properties
4. Records setup management
Item #1 and #3 are exactly the same as the standard ASB dialogs for the channels connection and the recorder setup.
Item #2 is also the same but only a subset of the events is handled by D-rec: Recorder trigger on Edge on Ext. synch, Level and delta level on DC inputs and periodic event only.
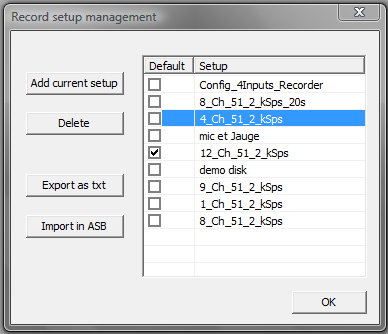
Item #4 allows managing the setups saved in the analyzer. The D-rec setups can be written, removed, imported and exported from this dialog box.
To write an NVGate configuration in the hardware, press the "Add current setup" button. The current front-end and recorder settings will be saved in the analyzer. Note that all active channels (IN, DC, EXT and CAN) will automatically be connected to the recorder tracks. To delete a D-rec setup, select it in the list and press "Delete".
One of the D-rec setups saved in the analyzer can be set as the default setup when starting the D-rec. Check it in the "Default" column.
Each setup can be exported in text file to be used as a trace of the D-rec settings when using it on-site. Of course it is possible to control the front-end and recorder settings with the LCD menus, but a paper sheet or file overview is more comfortable to install the transducers and cables. To create a description file, use the "Export as txt" button.
It is possible to recover, control or modify an existing D-rec setup which is already saved in the analyzer. The "Import in ASB" function will setup the current NVGate ASB with the configuration saved in the analyzer.
Automatic recorder setup
D-rec has been designed to record without a PC. Such operations require a setup validation and are followed by a signal post-processing. With D-rec you can focus on the goal of your data acquisition rather that minding about channels, coupling and bandwidths.
With your analyzer connected you can prepare your analysis with NVGate focusing on which result you expect: spectra, order extraction, triggering threshold and others. Moreover you can validate that this front-end and analysis setup will provide the results you want.
When your analysis setup is ready, you can add it to the D-rec setup list (see below) with the "Setup\D-rec setup(s)…" menu entry. NVGate will activate the recorder with all the active inputs. You can go and make your measurements in confidence.
Part 3: recovering the signal with NVGate
The recorded signals are recovered with the NVGate project manager. To be accessible, the measurements must be associated to one project. Like the on-line records, the signal data can stay on the Mobi-Disk or be downloaded into the host PC hard-drive.
After a D-rec session(s), the signal recovery is operated through NVGate with the Mobi-Disk connected. The Mobi-Disk connection can be:
- Running NVGate in the connected mode with the Mobi-Disk inside the hardware,
- Running NVGate in the office mode with the Mobi-Disk connected to a USB port of the host PC.
When NVGate starts and is connected to a Mobi-disk that contains signals recorded with D-rec, the following message appears.
You can skip it and process later. In this case the menu entry "Hard-drive\manage" will show the same dialog box as the "Open Hard drive manager" button.
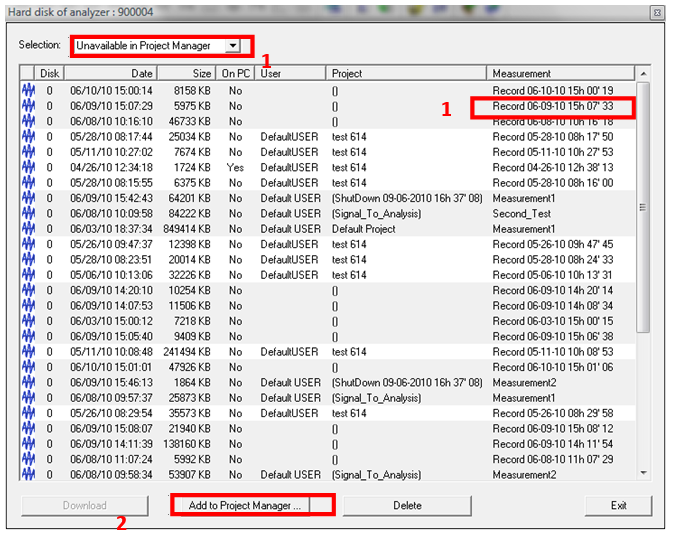
The Hard drive manager lists all the files (records) present in the active disk (in the hardware or USB connected). The records made in stand-alone are automatically named with the date/time based on the analyzer real-time clock.
To recover these files in the project manager:
1. Select the measurements to process. Automatic selection is available from the top combo-box (select unavailable in project manager) or manual selection with the mouse and CTRL or SHIFT buttons.
2. Press the bottom "Add to Project Manager" button to add these records into one of your projects.
The signal files are now ready for visualization, post-processing and export. The data are still on the Mobi-Disk. Use the download function to copy it on the PC hard-drive.
- To be previewed the files must be loaded into the player with the Load and preview function. The signal previewing computation may take a few seconds, it occurs one time only.
- When exportation is needed, the files must be downloaded to the PC hard drive first.
Note: Some sub-menus are not described in this diagram.
Video exemple
Washing machine vibration analysis (using D-rec @30Seconds).
