Difference between revisions of "NVGate Control Panel"
Jump to navigation
Jump to search
| (10 intermediate revisions by 3 users not shown) | |||
| Line 1: | Line 1: | ||
[[category:NVGate]] | |||
====Control Panel description==== | |||
The configurable Workspace area provides quick access to settings and/or ASB status. It looks similar to the "Favorites" in Internet Explorer. The settings can be arranged into customizable tabs. | |||
[[File:Customize_control_panel_2022.JPG|100px]] | |||
To configure the control panel, right click on the control panel and select Customize Control Panel or use the menu Automation \ Customize Control Panel. | |||
To configure the control panel, right click on the control panel and select Customize Control Panel or use the menu | |||
=====Tabs===== | =====Tabs===== | ||
[[Image:Reports_Tools_Ribbons_140.png | [[Image:Reports_Tools_Ribbons_140.png]] [[Image:Reports_Tools_Ribbons_141.png]] | ||
[[Image:Reports_Tools_Ribbons_141.png | |||
*'''Setting:''' It is possible to create as many setting tabs as wanted. These tabs can contain settings or statuses (max 20). | |||
It is possible to create as many setting tabs as wanted. These tabs can contain settings or statuses (max 20). | |||
*'''Status:''' The status area is just above the buttons and is visible whenever a setting tab is selected. It may contain only statuses. Each time a plug-in is connected, the corresponding status bar is automatically added to the control panel. | |||
The status area is just above the buttons and is visible | |||
*'''Macro:''' This tab is dedicated to the "Macro" button. | |||
This tab is dedicated to the "Macro" button. | |||
=====Customize===== | =====Customize Control panel===== | ||
[[Image:Reports_Tools_Ribbons_142.png|framed|none]] | [[Image:Reports_Tools_Ribbons_142.png|framed|none]] | ||
| Line 29: | Line 24: | ||
[[Image:Reports_Tools_Ribbons_143.png|framed|none]] | [[Image:Reports_Tools_Ribbons_143.png|framed|none]] | ||
* Settings tab: Displays all available settings in tree format similar to the Analyzer Setting Browser. | * '''Settings tab:''' Displays all available settings in tree format similar to the Analyzer Setting Browser. Settings can be added only to the Settings tab. | ||
* Status tab: Displays all available settings in tree format similar to the Analyzer Setting Browser. Status can be added to the Status area or to the Settings tab. | * '''Status tab:''' Displays all available settings in tree format similar to the Analyzer Setting Browser. Status can be added to the Status area or to the Settings tab. | ||
* Macro tab: Displays the list of available macros. Macros can only be added to the Macro tab. | * '''Macro tab:''' Displays the list of available macros. Macros can only be added to the Macro tab. | ||
{|border="0" cellspacing="0" cellpadding="4" width="70%" align="left" | |||
|- | |||
|[[Image:Reports_Tools_Ribbons_144.jpg]] | |||
|'''Add to Control panel:''' add the item selected (status, setting or macro) from the previous tabs to the control panel. | |||
|- | |||
|[[Image:Reports_Tools_Ribbons_145.jpg]] | |||
|'''Remove:''' Removes the selected item from the control panel. | |||
|- | |||
|[[Image:Reports_Tools_Ribbons_146.jpg]] | |||
|'''Create a new tab:''' Creates a new tab used to contain settings or status. | |||
[[Image: | |- | ||
|[[Image:Reports_Tools_Ribbons_147.jpg]] | |||
|'''Remove a tab:''' Removes the selected setting tab. | |||
|- | |||
|[[Image:Reports_Tools_Ribbons_148.jpg]] | |||
|'''Rename a tab:''' Changes the name of the selected tab. | |||
|- | |||
[[Image: | |[[Image:Reports_Tools_Ribbons_149.jpg]][[Image:Reports_Tools_Ribbons_150.jpg]] | ||
|'''Push up/down the setting/status:''' Used to change the order of the items in the current tab | |||
= | |}<br clear="all"> | ||
*'''Status Area:''' Display all statuses that have been selected. The tab can only be used for statuses. | |||
*'''Macro Tab:''' Display all macros that have been selected. The tab can only be used for macros. | |||
*'''Settings Tab:''' Display all settings and statuses that have been selected. | |||
''Note 1: It is possible to change the name of the settings and status by right-clicking on the item and select Rename in the popup menu.'' <br> | |||
''Note 2: It is possible to use drag and drop to add items.'' | |||
<Youtube>https://www.youtube.com/watch?v=gRNkClrmBJU</Youtube> | |||
Revision as of 15:21, 7 January 2022
Control Panel description
The configurable Workspace area provides quick access to settings and/or ASB status. It looks similar to the "Favorites" in Internet Explorer. The settings can be arranged into customizable tabs.
To configure the control panel, right click on the control panel and select Customize Control Panel or use the menu Automation \ Customize Control Panel.
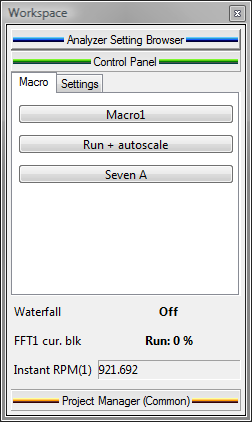
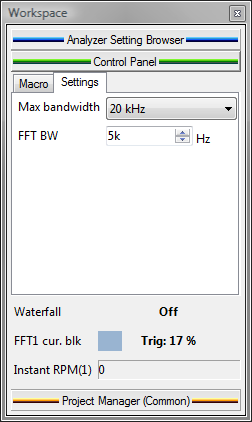
Tabs
- Setting: It is possible to create as many setting tabs as wanted. These tabs can contain settings or statuses (max 20).
- Status: The status area is just above the buttons and is visible whenever a setting tab is selected. It may contain only statuses. Each time a plug-in is connected, the corresponding status bar is automatically added to the control panel.
- Macro: This tab is dedicated to the "Macro" button.
Customize Control panel
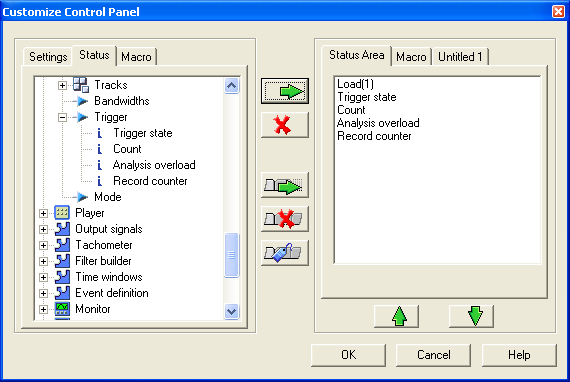
The left part of the window contains the items that can be added to the control panel. The right part contains the tabs used to receive and organize these items.
- Settings tab: Displays all available settings in tree format similar to the Analyzer Setting Browser. Settings can be added only to the Settings tab.
- Status tab: Displays all available settings in tree format similar to the Analyzer Setting Browser. Status can be added to the Status area or to the Settings tab.
- Macro tab: Displays the list of available macros. Macros can only be added to the Macro tab.
- Status Area: Display all statuses that have been selected. The tab can only be used for statuses.
- Macro Tab: Display all macros that have been selected. The tab can only be used for macros.
- Settings Tab: Display all settings and statuses that have been selected.
Note 1: It is possible to change the name of the settings and status by right-clicking on the item and select Rename in the popup menu.
Note 2: It is possible to use drag and drop to add items.


