Difference between revisions of "NVGate Project manager"
| Line 292: | Line 292: | ||
An icon to the left of the Signal icon indicates the location of the signal file. The table below explains the meaning of the 6 icons that can be found: | An icon to the left of the Signal icon indicates the location of the signal file. The table below explains the meaning of the 6 icons that can be found: | ||
{|border="2" cellspacing="0" cellpadding="4" width="100%" align="center" | {|class="wikitable" style="background:white" border="2" cellspacing="0" cellpadding="4" width="100%" align="center" | ||
| | | | ||
[[Image:Project_Manager_User_Pref2_48.png|framed|none]] | [[Image:Project_Manager_User_Pref2_48.png|framed|none]] | ||
Revision as of 15:17, 9 December 2021
Introduction
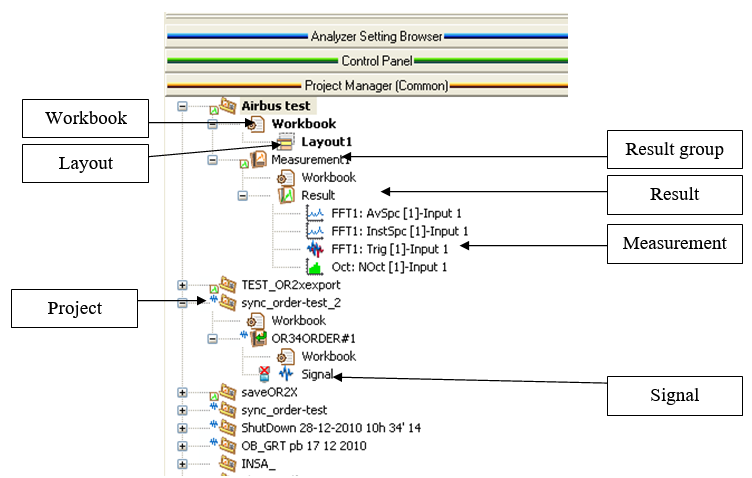
The Project Manager is made up of 3 main parts: The Workbook, the Project and the Measurement.
Project manager
The Project Manager is used to store all of your projects, results, and measurements. There are several display options that enable you to show or hide certain items. You can display some results with drag and drop.
Item definitions
Project
![]() The project is the highest level of the organizational structure. It contains at least one workbook and can receive an unlimited number of measurements. The project has therefore two main aspects:
The project is the highest level of the organizational structure. It contains at least one workbook and can receive an unlimited number of measurements. The project has therefore two main aspects:
- Configuration of the analyzer and the interface using the workbook
- Storage of data using the measurements
There is always one active project. This is this project that receives the new measurements. The project workbook configures the analyzer. To load a project, select the load command in the pop-up menu associated with the project item.
Workbook
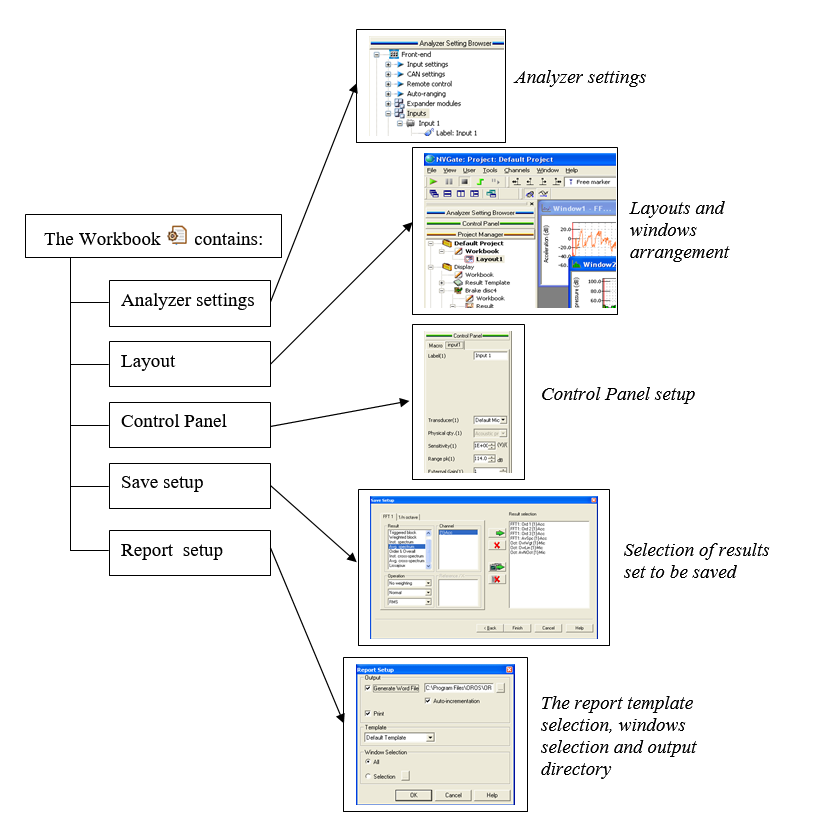
![]() The workbook is designed to manage the analyzer and software setup. The table below gives the details of the functions managed by the workbook.
The workbook is designed to manage the analyzer and software setup. The table below gives the details of the functions managed by the workbook.
| Analyzer setup | The value of all analyzer settings |
| Layout | All windows displaying results are stored in layouts. |
| Control panel | The personalization of the control panel. |
| Save setup | All results that must saved when a new measurement is created. |
| Report setup | All information regarding report generation. |
Saving
The project workbook is saved when the project is saved. This can be done several ways:
- Select the "Save" command in the pop-up menu associated with the project item.
- Select the "Save project" command from the file menu.
- Use the shortcut "Ctrl + D"
A workbook is created when a measurement is created. This workbook is the copy of the project workbook at the time the measurement is created. This allows you to recover the settings used for a measurement possibly reuse them.
Loading
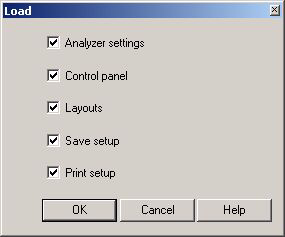
The workbook is automatically loaded when a project is loaded. It is also possible to load the content of any other workbook to the workbook of the active project. This load can be complete or partial and can be done by:
- Selecting the "Load" or "Partial load" command in the pop-up menu associated with the workbook item.
- Selecting the "Reload" or "Partial reload" command in the pop-up menu associated with the active workbook item. In this case, the last saved copy of this workbook is used.
- Select the "Change workbook" command in the pop-up menu associated with the project item.
This allows you to select any workbook from project database or any workbook template.
Activating
When a measurement is loaded, selecting the appropriate workbook will perform the switch between the measurement and the result mode. This selection can be made by:
- Selecting the "Activate" command in the pop-up menu associated with the workbook item.
Layout
![]() The layout is the part of the workbook that contains the graphic windows. There is no limitation of number of layouts, but the workbook always has at least one layout.
The layout is the part of the workbook that contains the graphic windows. There is no limitation of number of layouts, but the workbook always has at least one layout.
The windows displayed are the active layout windows. There are several ways to select a layout:
- Double-click on the layout item in the project manager.
- Select the load command in the pop-up menu associated with the layout item in the project manager.
- Selecting the layout from the tab "measurement" :
- Use the shortcut "Ctrl + Space bar" to switch to the previous active layout.
- Use the shortcut "Ctrl + Maj+ Space bar" to switch to the next the layout
Notes: The layouts are associated with the analysis mode (Measurement or Result mode) and are available only in the correct mode. Therefore, a name used for a layout in the measurement mode will not be available in result mode.
- The selected tabulation of the control panel is related to the layout. This is designed to minimize the selection in the workspace.
Result Template
![]() This item appears when results template are added to the project. They can be added from the Tab "tools": Mask or from the "Add to result template" menu in a window.
This item appears when results template are added to the project. They can be added from the Tab "tools": Mask or from the "Add to result template" menu in a window.
Displaying
To display the result template, Double-click on the item or select the "Display" command from the pop-up menu associated with the item.
Editing
To edit and modify the template result, use the Tools\Result Template\Main menu or the "Edit" command of the pop-up menu associated with the item.
Measurement
![]() This item is designed to store data. The data can be of two types:
This item is designed to store data. The data can be of two types:
- Signals coming from the recorder
- Results coming from an analyzer (FFT, Octave, Waterfall...)
A measurement always contains one workbook, which is a copy of the workbook used to create the measurement.
The most important action that can be performed on a measurement is to load it to work in measurement mode. This can be done from the pop-up menu associated with the item.
Imported measurement
![]() This item comes from the import of a result or a signal file.
This item comes from the import of a result or a signal file.
The behavior of this item is similar to the behavior of a usual measurement item. It differs only in that the workbook associated with the measurement is empty. There is no information about the analyzer settings, or about the layouts and other workbook elements.
Result group
![]() This item gathers all results of a measurement. The two main actions that can be performed from this item are:
This item gathers all results of a measurement. The two main actions that can be performed from this item are:
Displaying
Display all results of the measurement.
One window per type of result is created, limited by the maximum curve the window can contain. This can be done from the pop-up menu associated with the item.
Exporting
Export all the results of the measurement.
Exports the results in an external format (UFF…). This can be done from the pop-up menu associated with the item.
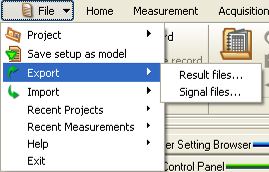
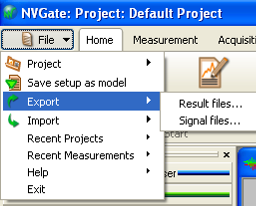
A command to export the results of several measurements at the same time is also available in the "File" menu.
For more details about the export formats, see the "Export" topic from the "Chapter 7: User Preferences".
Result
This type of item can belong to a Result group item, a Ref. Result Item or a Template Result item.
The icon associated with the item indicates the results type. The table below lists the different icons that can be found.
The main action that can be performed from this item is to display the result.
A new window is created, containing the result. This can be done from the pop-up menu associated with the item. This can also be done by double clicking on the item.
Signal
![]() This item represents a signal file generated by the recorder. Depending on the analysis, the item points to file located on the PC or the analyzer hard disk (see "Signal location" topic p 18).
This item represents a signal file generated by the recorder. Depending on the analysis, the item points to file located on the PC or the analyzer hard disk (see "Signal location" topic p 18).
The main actions that can be performed are:
Loading
Loading the file in the player:
Once loaded to the player, the signal can be displayed and post-analyzed. To load the file to the player, select the command "load in player" in the pop-up menu associated with the signal item. The signal file can also be loaded and displayed at once by double clicking on the signal item.
When the analyzer is connected, only files located on the analyzer hard disk can be loaded.
When the analyzer is not connected, only files located on the PC hard disk can be loaded.
In order to post-analyze the selected signal, a shortcut is available by right-clicking on the specified signal.
Uploading/Downloading
Upload\Download:
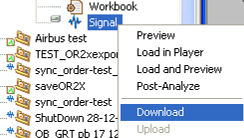
Used to transfer files to\from the analyzer hard disk from\to the PC hard disk. This can be done from the pop-up menu associated with the signal item.
A command to transfer several files at the same time is also possible.
Signals management
NVGate signal provides signal storage devices and used hardware for single and multi-hardware acquisitions.
2 dialog allows that the signal properties and the disk manager.
available in the "home" tab.
Signal properties
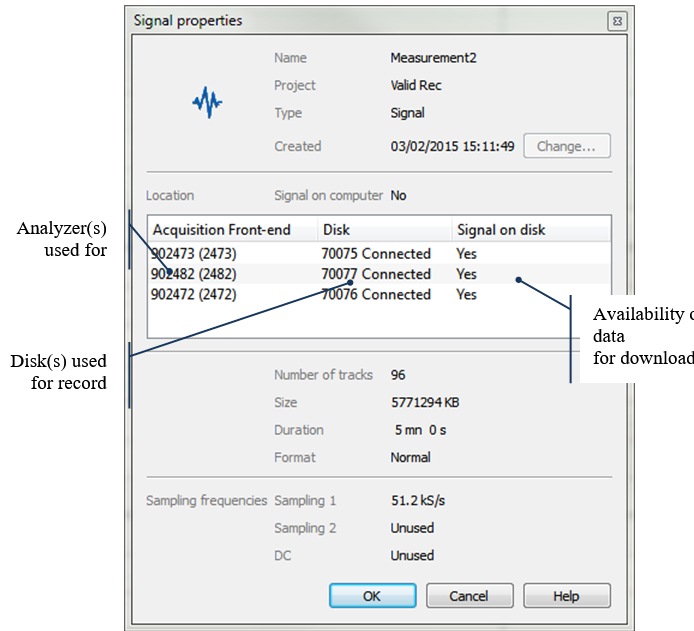
The properties of recorded signals includes location and traceability.
The analyzer(s) which have been used to record the signal are memorized in the column Acquisition Front-end. It is the easy to identify records that may be altered by a faulty input.
- Same thing regarding the used (Mobi-) disks.
- The information is saved with the measurement itself. They are available even if the analyzer or the disk is not connected.
- The Signal on disk indicates the presence of record file on the connected disks: Yes/No or a question mark when the disk is not connected.
Disks manager
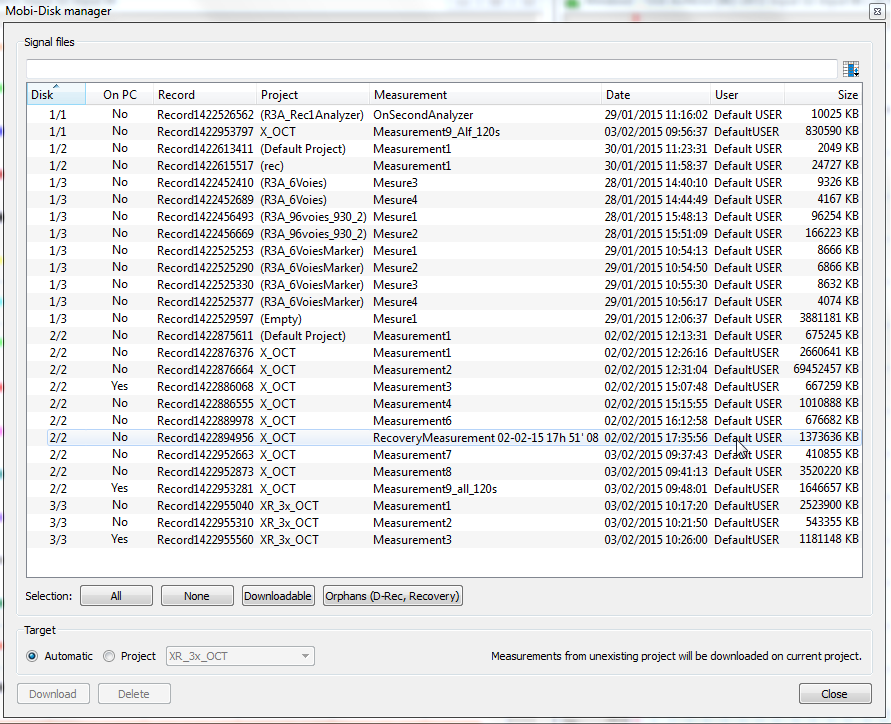
The disk management has also been adjusted allowing the management of multi-disk measurements. This dialog is accessible through the Home/Disk ribbon group.
Both Manage and Download buttons open it.
The dialog shows all records which have at least one file on the active disk(s): On analyzer(s) or on PC USB.
The preselection buttons have been split into 3 categories:
- All / None: for backup or disk cleaning.
- Downloadable: Select records which have corresponding project & measurement in the Project Manager.
- Orphans: Select records which haven't any corresponding project & measurement in the Project Manager.
NB: Preselection buttons do not select partial records. i.e. one or more disks are not connected. Use manual selection to download an incomplete record. Warning this is a definitive action. It will be impossible to add missing files later.
The Target choice allows choosing the download destination:
- Automatic: add each signal file in the Project/Measurement used for its acquisition. Note that records without Project/Measurement correspondence in the Project manager will be added in the current project.
- Project: add the signal files in the selected project regardless of original project.
Exporting
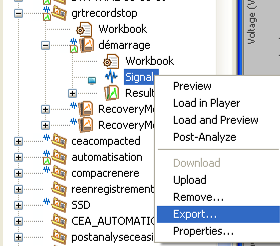
Export:
Exports the signal file in an external format (wav…).
A signal can be exported only when it is located on the PC hard disk. The export can be done from the pop-up menu associated with the signal item.
A command to export several files at the same time is also available in the "File" menu.
For more details about the export formats, see the "Export" topic from the "Chapter 7: User Preferences".
Item status
Protection
An icon can appear to the left of the project, workbook, layout and measurement icon. When there is no icon, this means that the item is not protected. The table below explains the meaning of the 6 icons that can be found:
| The item is in read-only. This protection can be removed using the properties command by unselecting the read-only protection. | |
| The item does not belong to the current user and is protected by its user. The current user cannot modify this item. | |
| The item does not belong to the current user, but is not protected. The current user can freely use this item. |
Signal location
An icon to the left of the Signal icon indicates the location of the signal file. The table below explains the meaning of the 6 icons that can be found:
| The file is only on the analyzer hard disk. | |
| The file is only on the PC hard disk. | |
| The file is on both the PC and the analyzer hard disk. | |
| The file is on the PC and the analyzer is not connected (The file might also be on the analyzer hard disk). | |
| The file is not on the PC and the analyzer is not connected (The file might also be on the analyzer hard disk). | |
| The file is not found on the PC or on the analyzer hard disk. |
Active Items
When the action "Load" is performed for an item, then the item is active (the name of the item is displayed in bold).
An item is active when it is bold. The 4 items that can be active are:
Rules
Measurement creation
The way a new measurement is created is defined in the Save Setup dialog box using the Save Option property.
There are some specific cases where the behavior defined by the Save Option must be overridden:
- When the recorder is stopped, a measurement is created, overriding the "Do not save" choice.
- When the recorder is stopped, the measurement takes an specific name, overriding the "In default measurement" choice.
- For multi-analysis, the results corresponding to the different plug-ins are saved in separate measurements if the plug-ins do not stop simultaneously. While NVGate is Running (meaning that at least one plug-in is still running), the measurements are saved with "With name confirmation" unless the Save option choice is "Do not save".
Recovered project
Each time NVGate is not closed correctly and a default measurement is present in the project, the project is automatically loaded when NVGate is launched, to ensure that no data is lost. If the project was the "Default project", then to the user is prompted to rename this project "Recovered project".
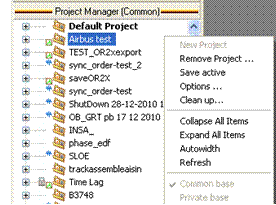
The contextual menus are accessible by right clicking on the area.
General
Appears by right clicking anywhere on the Project Manager background.
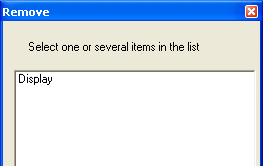
Remove project
This command opens the following dialog box.
You may also remove one or several projects from the project base. The current project cannot be removed.
Save active
This command saves the current project and, if there is a measurement loaded, it also saves the current measurement.
Options
This command opens the following dialog box:
This option is used to modify the way the project manager is presented.
- Project: It is possible to hide projects that do not belong to the current user. This is particularly useful when there are multiple NVGate users on the same PC.
The project can be sorted alphabetically, chronologically or inversely chronologically.
- Measurement: The measurement can be filtered by keyword. The keywords are assigned to the measurement when it is created, or can be changed in measurement properties. This option is very helpful when organizing measurement campaigns.
- General: It is possible to hide all the inactive workbooks and to delete the measurement level. The table below illustrates the differences:
- Save in user preferences:
These settings can be stored in the user preferences and can be set in the preferences.
See "Chapter 7: User preferences".
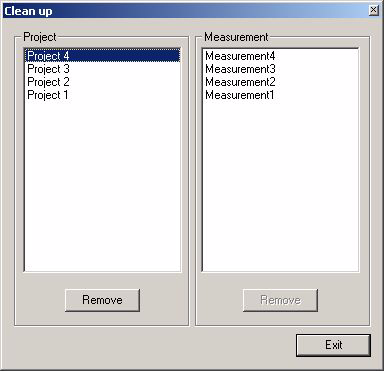
Clean up
The purpose of the following dialog box is to accelerate the cleaning of the project base. It is used to remove projects or measurements.
- Project: The list contains all projects except the current one. Once a project is selected, it is possible to remove the full project or to select a measurement to remove. If several projects are selected, it is then only possible to remove the selected project.
- Measurement: When one project is selected, the list of project measurements is displayed and available to be removed.
Collapse all items
Collapses all the branches of the project manager tree. Only the project items are visible.
Expand all items
Expands the entire branch of the project manager tree. All the items of the tree are visible. This can make the tree very large.
Auto width
Adjusts the width of the tree to the widest branch, so that every item is fully visible.
Project
- Save: This command is available only on the current project. It saves the project workbook.
- Save as: This command is available only on the current project. It saves the project with a different name. It is a way of copying the current project.
Properties
This command gives general information about the project.
It is possible to modify the project attribute. When "Read-only" is selected, it is not possible to modify the project. When "Read-only to all other users" is selected, the project cannot be modified by another user, but can be used freely.
"Allow access to" property must be set on "All users" to enable restricted users to use this project.
A comments area is available to add information. (Use "Ctrl + Return" to start a new line).
The "Stand alone" button is available only when the project is linked to a stand-alone session. It gives information about the session and may be used to abort the session.
Rename
This command is not available on the current project (Use "Save As" instead). It may be used to change the name of the project.
Load
This command loads the selected project. The project becomes the current project.
Remove
This command removes the selected project. The data contained is lost permanently.
Workbook
Load
This command loads the selected workbook to the current project.
Note: when the current project workbook is saved, the initial workbook (the one initially loaded) is not modified.
Partial load
This command is similar to the "Load" command, but only parts of the workbook are loaded.
The parts of the workbook that are not selected remain unchanged.
Reload
This command is available only for the current project workbook. This command reloads the workbook of the current project workbook. This means that the workbook recovers the setup it had the last time it was saved.
Partial Reload
This command is available only for the current project workbook. This command is similar to the "Reload" command, but only parts of the workbook are loaded.
The parts of the workbook that are not selected remain unchanged.
Save
This command is available only for the current project workbook. This command saves the workbook.
Save as Model
This command is available only for the current project workbook. This command saves the workbook in the workbook library. This makes the workbook available, however the project database will change in the future. The workbook models are available in the "Project\Change workbook" command and in the "New Project" command.
Activate
This command is available only for the current project workbook in result mode or for the current measurement in measurement mode. It changes the current mode
Add Layout
This command is available only for the current project workbook. It creates a new layout (with the desired name).
Remove Layout
This command is available only for the current project workbook. It removes the selected layout. This destroys all the windows that belong to this layout.
Properties
This command gives general information about the workbook.
It is possible to modify the workbook attributes. When "Read-only" is selected, it is not possible to modify the workbook. When "Read-only to all other users" is selected, the workbook cannot be modified by another user, but can be used freely.
A comments area is available to add information (Use "Ctrl + Return" to start a new line).
Layout
Rename
This command is used to rename the selected layout.
Properties
This command gives general information about the layout.
It is possible to modify the layout attributes. When "Read-only" is selected, it is not possible to modify the layout. When "Read-only to all other users" is selected, the layout cannot be modified by another user, but can be used freely.
A comments area is available to add information (Use "Ctrl + Return" to start a new line).
Measurement
EDIT
This command loads the measurement. The analysis mode is then set to "Result mode"
The Result editor is used for post-analysis of saved results. It allows to switch between 2 measurement workbooks in order to compare the results.
Rename
This command is used to rename the selected measurement.
Remove
This command removes the selected measurement. The data contained are permanently lost.
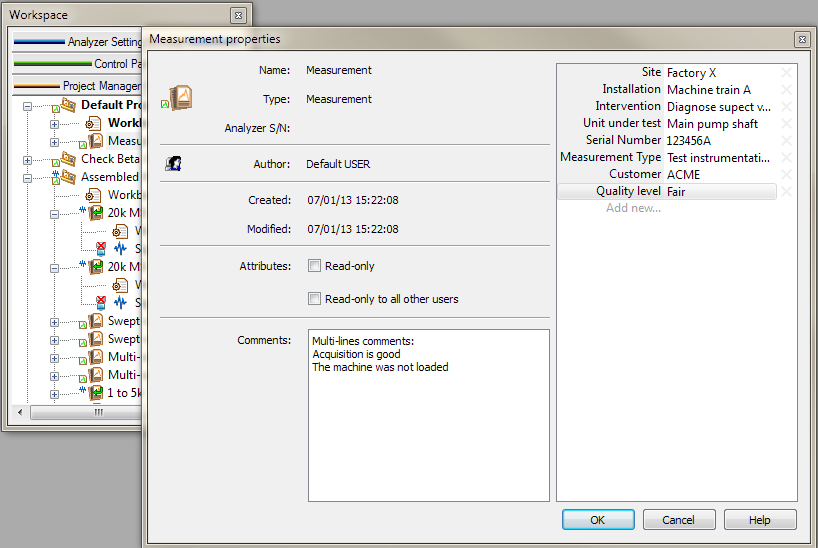
Properties
This command allows viewing or modifying the measurement properties in order to be used for future data mining.
It is possible to modify the measurement attributes depending on authorizations:
- When "Read-only" is selected, it is not possible to modify the measurement.
- When "Read-only to all other users" is selected, the measurement cannot be modified by another user, but can be used freely.
A comments area is available to add information (Use "Ctrl + Return" to start a new line).
Collapse items
This command collapses the entire branch of the selected measurement. Only the measurement item remains visible.
Expand items
This command expands the entire branch of the selected measurement. All items (workbook, results...) are expanded and made visible.
Result group
Remove
This command removes all the measurement results. The data is permanently lost.
Export
This command is used to export the result in an external format.
One or several formats may be selected from the list. It is possible to adjust the conversion via the preferences. The output directory is the folder where the new files will be created. The name will be used to create the output files. It should not contain any extension, as one will be added automatically depending on the format.
For more details about the export formats, see the export topic from the "Chapter 7: User Preferences".
Properties
This command gives general information about the results.
All the plug-ins that have provided results are listed, with their corresponding number of results.
Display
Displays all the measurement results. One window per type of result is created, limited by the maximum curve that the window can contain.
Result
Display
Displays the selected results in a new window.
Remove
This command is available only when the measurement is loaded. It is used to remove the result from the measurement.
Properties
This command gives general information about the result.
Add to template result
This command adds the selected result to the template results of the current project.
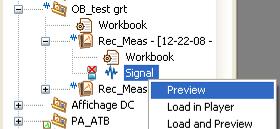
Signal
Preview
This command displays an overview of the signal. This command is available, even if the signal is on the analyzer hard disk and NVGate is in office mode.
Load in Player
This command loads the signal file to the player. It is then possible to display this signal, play the tracks on output, and perform post analysis.
Load and preview
This command combines the two previous commands.
Post-Analyze
This command loads the signal in the player and display the menu 'track connections' in order to define your post-analysis (drag and drop connected tracks to the plug-in analyzer you want to use).
If the time signal is recorded on the PC or on the Mobi-disc™, it is highly recommended to be in office mode (hardware inactive) in order to avoid low performances and malfunctions.
Download
This command is available only when hardware with a hard disk is connected and when the signal has not yet been downloaded. It transfers the recorded signal from the analyzer hard disk to the PC hard disk.
Upload
This command is available only when hardware with hard disk is connected and when the signal is not on the hard disk. It transfers the recorded signal from the PC hard disk to the analyzer hard disk
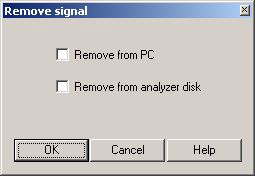
Remove
This command enables to remove the selected signal from the PC if the file is on the PC hard disk and from the analyzer hard disk of the hardware if connected and if the file is on the analyzer hard disk.
If, after removal, the file is not on the PC, or on the analyzer, the signal is permanently lost.
Export
This command is used to export the signal in an external format.
One or several formats may be selected from the list. It is possible to adjust the conversion via the preferences. The output directory is the folder where the new files will be created. The name will be used to create the output files. It should not contain an extension, as one will be added automatically depending on the format.
See more details about the export formats in the "Export" topic from the "User preferences".
Properties
This command gives general information about the result.
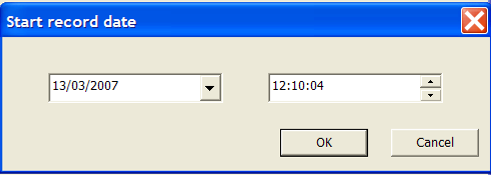
Change date: allows to change the date of the beginning of the signal. It used to display the absolute time.
Attachments
Add extra files on a folders for each Item (Project, Measurement and Model) that can hold various files not directly managed by NVGate. Ex: Voice record, Word pad, pictures, scheme, planning, etc…
Selecting Attachments…on the contextual menu (right click) of an Item of the project manager opens the Windows explorer in the corresponding Item directory/Attachments.
The files deposited in this directory will be transferred with the Items during share/collate actions.
