Difference between revisions of "NVGate Recorder"
| (19 intermediate revisions by 3 users not shown) | |||
| Line 1: | Line 1: | ||
[[category:NVGate]] | |||
[[Image:Recorder_group.png|framed|right]] | |||
The Recorder module is used to configure the time signal recording sessions (Bandwidth, Trigger). | The Recorder module is used to configure the time signal recording sessions (Bandwidth, Trigger). | ||
| Line 12: | Line 13: | ||
==Tutorial== | ==Tutorial== | ||
===Using Go to result=== | ===Using Go to result=== | ||
Just click on "record | Just click on "record signals" using Go to result windows. The track will be automatically recorded. | ||
[[File:Recorder_goto.png| | [[File:Recorder_goto.png|border|none|500px]] | ||
<youtube>https:// | <youtube>https://www.youtube.com/watch?v=V7oYB7OfEu8&list=PLwB9Ae8PGEbP-aPxWtOo1m59tingiiBIq&index=64 </youtube> | ||
===Using Connect Inputs=== | ===Using Connect Inputs=== | ||
For connecting, DC channels, Can Bus, Xpods,(...) we | For connecting, DC channels, Can Bus, Xpods,(...) we advise users to enable the input and do a drag and drop into the recorder. | ||
[[File:Connects inputs.png| | [[File:Connects inputs.png|border|none|500px]] | ||
===Display=== | ===Display=== | ||
On [[NVGate Ribbons: Measurement Tab|measurement tab]], click on view recording. | On [[NVGate Ribbons: Measurement Tab|measurement tab]], click on view recording. | ||
[[File:view_recording2.png| | [[File:view_recording2.png|border|none|300px]] | ||
==== Real-Time Zoom ==== | |||
Drag and drop the section of the signal you're interested in while recording, and the selected part will be instantly zoomed in. You can zoom in on multiple sections simultaneously in different windows, enhancing your real-time analysis and visualization capabilities. | |||
[[File:recording_zoom.png|800px]] | |||
==Available results:== | ==Available results:== | ||
| Line 30: | Line 37: | ||
{|border="2" cellspacing="0" cellpadding=" | {|class="wikitable" style="background:white" border="2" cellspacing="0" cellpadding="0" width="91%" align="center" | ||
|'''Type''' | |'''Type''' | ||
|'''Size''' | |'''Size''' | ||
| Line 71: | Line 78: | ||
[[Image:Recorder_group.png|framed|right]] | [[Image:Recorder_group.png|framed|right]] | ||
[[File:Recorder_ASB.png|right]] | [[File:Recorder_ASB.png|right]] | ||
* [[Image:Reports_Tools_Ribbons_343.png]] Available: Display the maximum possible recording duration depending the current recorder setup | * [[Image:Reports_Tools_Ribbons_343.png]] Available: Display the maximum possible recording duration depending on the current recorder setup. The max duration is computed from the free space of the selected hard disk, the number of tracks (and their corresponding sampling frequency) and the number of records. Note in time to stop, the max duration may also be limited by the local available memory (PC/Analyzer) for the description blocks. | ||
*Used Space: gives a visual overview of the disk occupation.<br> | *Used Space: gives a visual overview of the disk occupation.<br> | ||
| Line 78: | Line 85: | ||
* '''Source''': signal to be recorded. It may come from the input Front-end or from the Player in post analysis mode (see "Post analysis" topic chapter 6). | * '''Source''': signal to be recorded. It may come from the input Front-end or from the Player in post analysis mode (see "Post analysis" topic chapter 6). | ||
* '''Signal bandwidth''': frequency bandwidth of the recorded track. This value is equal to the sampling frequency of the recorded signal divided by 2.56 (this factor was chosen in order to avoid any aliasing | * '''Signal bandwidth''': frequency bandwidth of the recorded track. This value is equal to the sampling frequency of the recorded signal divided by 2.56 (this factor was chosen in order to avoid any aliasing problems during frequency analysis). For the DC input this setting is forced to the input setting DC input sampling value. For the External Synchro input this setting is forced to the input setting input sampling value. For the input, the user can choose between the 2 frequencies bandwidths defined in the next settings. | ||
=====Mode===== | =====Mode===== | ||
This sub-module is used to define the recording set-up (record on PC hard disk or on the analyzer hard disk, the number of records...). | This sub-module is used to define the recording set-up (record on PC hard disk or on the analyzer hard disk, the number of records...). | ||
* '''Automatic''': | |||
** All inputs: All inputs activate in the frond end are put into the recorder. | |||
** No input: Recorder is off | |||
** Disabled: the automatic Mode is disabled. The channels need to be put manually into the recorder (refer to the recorder/tracks or connect track). | |||
* '''Record''': enables the Record plug-in. The user can choose between Off (the recorder is disabled) and On PC (in the Office mode) or On analyzer (in the Connected mode). | * '''Record''': enables the Record plug-in. The user can choose between Off (the recorder is disabled) and On PC (in the Office mode) or On analyzer (in the Connected mode). | ||
* '''Mode'''[[Image:Reports_Tools_Ribbons_339.png]]: defines the ways the signal is recorded. | * '''Mode'''[[Image:Reports_Tools_Ribbons_339.png]]: defines the ways the signal is recorded. | ||
{|border="2" cellspacing="0" cellpadding="4" width="92%" | {|class="wikitable" style="background:white" border="2" cellspacing="0" cellpadding="4" width="92%" | ||
|'''Recorder mode''' | |'''Recorder mode''' | ||
|'''Description''' | |'''Description''' | ||
| Line 93: | Line 104: | ||
[[Image:Recorder_04.png|framed|none]] | [[Image:Recorder_04.png|framed|none]] | ||
|Acquisition begins on the start event and stops when the specified duration has been recorded. | |Acquisition begins on the start event and stops when the specified duration has been recorded. A user with the Stop command can stop the acquisition at any moment. If the Number of records is greater than 1, a new record is started with a new start event. When all the specified records have been recorded the plug-in goes in the Stopped state (the Stop command also forces the plug-in the Stopped state).<br><br><br> | ||
|- | |- | ||
| Line 126: | Line 137: | ||
* '''Format''': defines the format of the recorded samples. | * '''Format''': defines the format of the recorded samples. | ||
{|border="2" cellspacing="0" cellpadding="4" width="92%" | {|class="wikitable" style="background:white" border="2" cellspacing="0" cellpadding="4" width="92%" | ||
|'''Format''' | |'''Format''' | ||
|'''Description''' | |'''Description''' | ||
| Line 141: | Line 152: | ||
=====Trigger===== | =====Trigger===== | ||
This sub-module is used to | This sub-module is used to define the start and stop conditions of the signal to be recorded. | ||
* '''Recorder: '''defines the status of the recorder ("armed" or "unarmed"). The user can choose to arm the record in order to be ready for recording. When a "Run" is made with a recorder in the status "unarmed", before running the record will be set to "armed". In the status "armed", any modifications of Front End or Recorder settings put automatically the recorder in the status "unarmed". The action of "armed" corresponds to the creation of a .lxf file (which corresponds to save the record set up). | * '''Recorder: '''defines the status of the recorder ("armed" or "unarmed"). The user can choose to arm the record in order to be ready for recording. When a "Run" is made with a recorder in the status "unarmed", before running the record will be set to "armed". In the status "armed", any modifications of Front End or Recorder settings put automatically the recorder in the status "unarmed". The action of "armed" corresponds to the creation of a .lxf file (which corresponds to save the record set up). | ||
| Line 164: | Line 175: | ||
* '''Bandwidth'''[[Image:Reports_Tools_Ribbons_338.png]]: this is the signal frequency bandwidth in the frequency domain. The frequency bandwidth is equal to the sampling frequency divided by 2.56. | * '''Bandwidth'''[[Image:Reports_Tools_Ribbons_338.png]]: this is the signal frequency bandwidth in the frequency domain. The frequency bandwidth is equal to the sampling frequency divided by 2.56. | ||
The recorder | The recorder supports up to 4 different bandwidths: | ||
{|border="2" cellspacing="0" cellpadding="4" width=" | {|class="wikitable" style="background:white" border="2" cellspacing="0" cellpadding="4" width="60%" align="left" | ||
|Type | |'''Type''' | ||
|Range | |'''Range''' | ||
|Mode | |'''Mode''' | ||
|- | |- | ||
| Line 191: | Line 202: | ||
|Fixed | |Fixed | ||
|} | |}<br clear="all"> | ||
''Note: once running the recorder, the other plug-in analyzer settings cannot be modified without restarting the record.'' | |||
====Autobandwidth==== | ====Autobandwidth==== | ||
| Line 200: | Line 210: | ||
Autobandwith manages the analysis and recording bandwidths automatically. | Autobandwith manages the analysis and recording bandwidths automatically. | ||
The | The ''Inputs selection'' window '''allows the use of 2 different sampling rates for the dynamic inputs'''. It gathers inputs with the same physical quantity into groups, maintaining the same sampling into each group. | ||
When inputs are associated with '''the analysis plug-in, it adjusts its analysis bandwidth to match the inputs ones'''. Mixing input bandwidths in one analysis plug-in | When inputs are associated with '''the analysis plug-in, it adjusts its analysis bandwidth to match the inputs ones'''. Mixing input bandwidths in one analysis plug-in will set its bandwidth to the lowest one. | ||
''Autobandwidth'' is set by default in the concerned plug-ins. | ''Autobandwidth'' is set by default in the concerned plug-ins. | ||
| Line 212: | Line 222: | ||
[[Image:V11_release_23.png|framed|none]] | [[Image:V11_release_23.png|framed|none]] | ||
Deactivating the recorder<nowiki>'</nowiki>s ''Autobandwidth'' allows managing the dynamic inputs sampling from the recorder. | Deactivating the recorder<nowiki>'</nowiki>s ''Autobandwidth'' allows managing the dynamic inputs sampling from the recorder. It is recommended to keep the recorder ''Autobandwidth'' active unless the recording signal must be a lower frequency than the analysis. | ||
====Arming==== | |||
Arming of the recorder creates a backup of your record settings. Arming the recorder | Arming of the recorder creates a backup of your record settings. Arming the recorder secures the record allowing an easy recovery of the data regardless of the cause of the end of the recording. | ||
The recorder is armed automatically when pressing the RUN This operation may take a couple of seconds | The recorder is armed automatically when pressing the RUN button. This operation may take a couple of seconds. It is possible to pre-arm the recorder allowing an immediate start of the recorder. This is available from the ''Measurement'' tab of the ''Vision'' interface: | ||
[[Image:Recorder_01.png|framed|none]] | [[Image:Recorder_01.png|framed|none]] | ||
| Line 228: | Line 238: | ||
[[Image:Recorder_03.png|framed|none]] | [[Image:Recorder_03.png|framed|none]] | ||
===Part file length=== | |||
Since NVGate V17, Users have the flexibility to configure each time signal to include multiple records, with each record further divided into parts of customizable lengths. | |||
[[File:multirecord_multipart.png|700px]] | |||
By default, the recorder is configured with a single record and the part length set to 'Auto' as below: | |||
[[File:recorder_conf_1.png|400px]] | |||
The duration of a part can be configured in the advanced settings as below: | |||
[[File:recorder_conf_2.png|400px]] | |||
* Single file: Only 1 part per signal. | |||
* Short: Part length is set to 64 seconds. | |||
* Medium: Part length is set to 640 seconds. | |||
* Long: Part length is set to 1920 seconds. | |||
* Auto: The part length depends on the recording mode: | |||
** "Start to stop" mode: Part length is set to 640 seconds. | |||
** "Start to time" mode: | |||
*** If duration is longer than 100 hours, then part length is set to 1920 seconds; | |||
*** If duration is between 10 and 100 hours, then part length is set to 640 seconds; | |||
*** If duration is between 5 and 10 hours, then part length is set to 128 seconds; | |||
*** If duration is less than 5 hours, then part length is set to 64 seconds. | |||
** "Time to stop" mode: For duration of 1024 seconds or longer, the part length is set to 64 seconds. For shorter duration, the first power of 2 greater than duration/16 is selected. A minimum part length is enforced when the total record bandwidth is high. When the combined bandwidth of all recorded inputs exceeds 256 kHz, 512 kHz, or 1024 kHz, the minimum part length is set to 8, 16, or 32 seconds, respectively. | |||
==Recovering records== | ==Recovering records== | ||
The recorded data | The recorded data benefits from specific safety tools that allow recovering the data in case of failure during the record. | ||
There are 2 | There are 2 types of recovery: | ||
* Manual recovery: | * Manual recovery: if the initial project has been cancelled from your PC, or has been recorded with another PC, or if the project has been renamed. The recovering tools are available in the hard drive manager called from the ''Home ''tab/''Disk'' group (''Manage''). | ||
* Automatic | * Automatic recovery: in the case of an unexpected stop of the analyzer; i.e; during a recording, at the end of the recording or before saving the measurement. | ||
During the next launch of NVGate, the Disc is scanned, and then all unsaved files will be recovered if the initial project is found in the local tree diagram. The recovered measurement will be renamed with the date of record. | During the next launch of NVGate, the Disc is scanned, and then all unsaved files will be recovered if the initial project is found in the local tree diagram. The recovered measurement will be renamed with the date of record. | ||
This recovery type can handle multi records; the recover will be based on the shorter record. | This recovery type can handle multi records; the recover will be based on the shorter record. | ||
If an unexpected stop occurred (power | If an unexpected stop occurred (power outage …), signals will be recovered and only few seconds will be lost, depending on the configuration of your record (sampling frequency, slow inputs). | ||
For example at 1 ch @ 51.2 kS/s, a maximum of 2.5 s could be lost. | For example, at 1 ch @ 51.2 kS/s, a maximum of 2.5 s could be lost. | ||
If the mode <nowiki>’</nowiki>Time to stop<nowiki>’</nowiki> in the recorder is selected, unsaved files will not be recovered. | If the mode <nowiki>’</nowiki>Time to stop<nowiki>’</nowiki> in the recorder is selected, unsaved files will not be recovered. | ||
Revision as of 13:20, 19 September 2024
The Recorder module is used to configure the time signal recording sessions (Bandwidth, Trigger).
This plug-in is used to record signals from the different types of Front-end (inputs, DC inputs or external synch inputs) or Player inputs (in Post-Analysis mode). The data can be recorded on the PC hard disk in office mode or on the OR3x hard disk in connected mode. Each recorded signal is called a track in the recorder. A recorded signal file can contain up to 4 different sampling frequencies:
- One for parametric inputs
- One for external synch inputs
- Up to 2 for other inputs
The user can select a trigger event to start the acquisition of a record and another one to stop the record.
Tutorial
Using Go to result
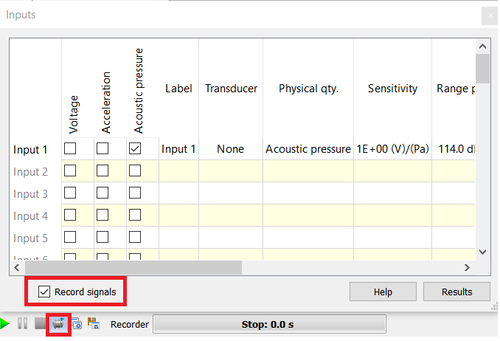
Just click on "record signals" using Go to result windows. The track will be automatically recorded.
Using Connect Inputs
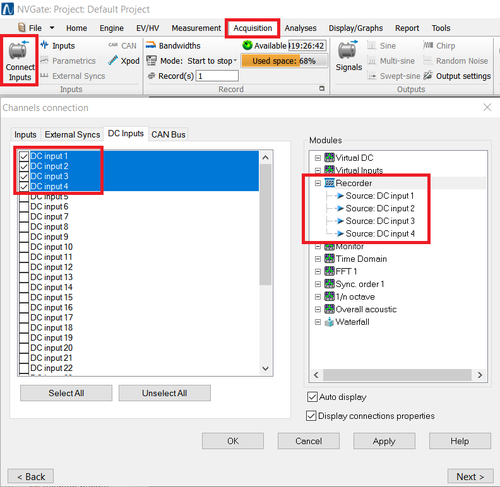
For connecting, DC channels, Can Bus, Xpods,(...) we advise users to enable the input and do a drag and drop into the recorder.
Display
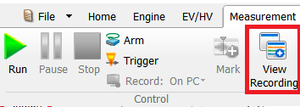
On measurement tab, click on view recording.
Real-Time Zoom
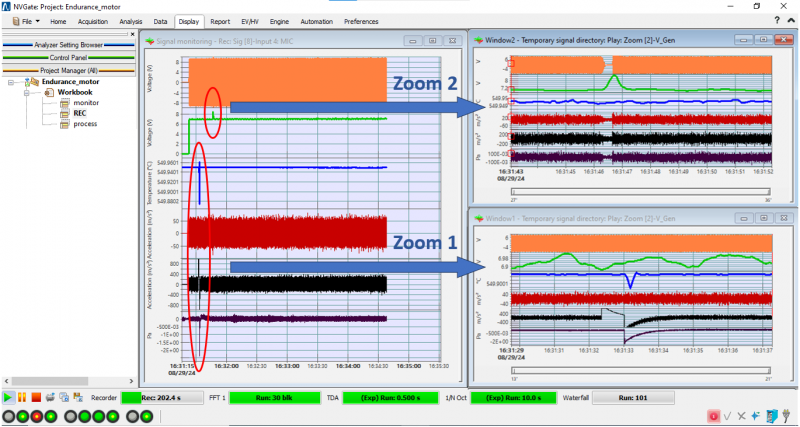
Drag and drop the section of the signal you're interested in while recording, and the selected part will be instantly zoomed in. You can zoom in on multiple sections simultaneously in different windows, enhancing your real-time analysis and visualization capabilities.
Available results:
| Type | Size | Dimension | Domain | Save |
| RMS | 1 pt | 1D | Display only | |
| Monitoring Signal | 2048 pt max | 2D | Compressed time | Saved on PC hard disk |
| Time | 20, 40 or 60 GBytes<ref>Depending on the analyzer type</ref> | 2D | Time | Saved on PC or on Analyzer hard disk. |
RMS: RMS level measured on a recorded input signal computed on the selected bandwidth.
Monitoring signal: this result displays the compressed input signal after frequency decimation. The result is only updated during recording.
Time: time domain signal sampled at Sampled Frequency 1 or Sampled Frequency 2 automatically saved on hard disk during acquisition.
All the results are available using Add/remove windows.
Settings
 Available: Display the maximum possible recording duration depending on the current recorder setup. The max duration is computed from the free space of the selected hard disk, the number of tracks (and their corresponding sampling frequency) and the number of records. Note in time to stop, the max duration may also be limited by the local available memory (PC/Analyzer) for the description blocks.
- Used Space: gives a visual overview of the disk occupation.
Tracks
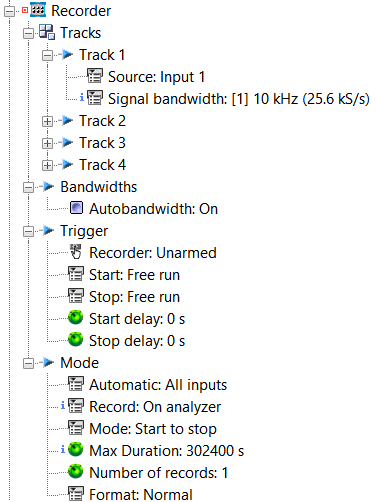
Used to configure the track x to be recorded.
- Source: signal to be recorded. It may come from the input Front-end or from the Player in post analysis mode (see "Post analysis" topic chapter 6).
- Signal bandwidth: frequency bandwidth of the recorded track. This value is equal to the sampling frequency of the recorded signal divided by 2.56 (this factor was chosen in order to avoid any aliasing problems during frequency analysis). For the DC input this setting is forced to the input setting DC input sampling value. For the External Synchro input this setting is forced to the input setting input sampling value. For the input, the user can choose between the 2 frequencies bandwidths defined in the next settings.
Mode
This sub-module is used to define the recording set-up (record on PC hard disk or on the analyzer hard disk, the number of records...).
- Automatic:
- All inputs: All inputs activate in the frond end are put into the recorder.
- No input: Recorder is off
- Disabled: the automatic Mode is disabled. The channels need to be put manually into the recorder (refer to the recorder/tracks or connect track).
- Record: enables the Record plug-in. The user can choose between Off (the recorder is disabled) and On PC (in the Office mode) or On analyzer (in the Connected mode).
- Mode
 : defines the ways the signal is recorded.
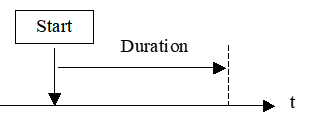
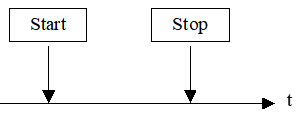
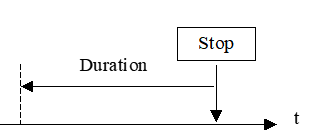
| Recorder mode | Description |
| Start to time |
Acquisition begins on the start event and stops when the specified duration has been recorded. A user with the Stop command can stop the acquisition at any moment. If the Number of records is greater than 1, a new record is started with a new start event. When all the specified records have been recorded the plug-in goes in the Stopped state (the Stop command also forces the plug-in the Stopped state). |
| Start to stop |
Acquisition begins on the start event and stops when the user sends a stop command or when a stop event occurs (depending on the selected stop event). If the Number of records is greater than 1, a new record is started with a new start event. When all the specified records have been recorded the plug-in goes in the Stopped state (the Stop command also forces the plug-in the Stopped state). |
| Time to stop |
Acquisition begins on the Run command. The record stops when a stop event has been detected or when the user sends a Stop command. The duration of the recorded signal is equal to the minimum between the time elapsed since the Run command and the value specified in the Duration setting (i.e. only the last Duration seconds of the recorded inputs are saved in the signal file). |
- Duration: defines the duration of a record.
- Max duration: displays the largest value for the Duration setting corresponding to the space available on the selected hard disk (PC hard disk in Office mode or the OR3x hardware HD in Connected mode). The max duration is computed from the free space of the selected hard disk, the number of tracks (and their corresponding sampling frequency) and the number of records.
In the Time to stop mode the maximum duration is defined by the size of memory available on the hardware. For information only, if the record is on the analyzer hard drive, max size is 262144 blocks of 2048 samples. Max duration is then: (262144 * 2048)/(Sampling freq*Nb. Channels) :)
If the Record is on the PC the max size is 1048576 blocks of 2048 samples .
For "V1 hardware" the available size is either 262144 blocks of 2048 samples.
Hidden/fixed: Fixed
- Number of records
 : defines the number of records (1 to 1000). The recorded signal file can contain several records except in the Time to stop recorder mode (in this case only one record is available).
Note: The start and stop displayed on the picture below are not the start and stop of the analyzer, but the ones of the recorder i.e. the start and stop trigger.
- Format: defines the format of the recorded samples.
| Format | Description |
| Normal | Samples are saved in 32 bit floating point format in SI unit |
| Compacted | Samples are saved in 16 bit signed integer format in logical unit (-32767<= sample value <= 32768). This format reduces the amount of hard disk space and throughput required by a factor of 2. |
Trigger
This sub-module is used to define the start and stop conditions of the signal to be recorded.
- Recorder: defines the status of the recorder ("armed" or "unarmed"). The user can choose to arm the record in order to be ready for recording. When a "Run" is made with a recorder in the status "unarmed", before running the record will be set to "armed". In the status "armed", any modifications of Front End or Recorder settings put automatically the recorder in the status "unarmed". The action of "armed" corresponds to the creation of a .lxf file (which corresponds to save the record set up).
- Start: defines an event to start the recorder. The user can choose any event among the list of defined events. By default only the Free run and Manual events are available. The user can define another event in the "Event Definition" shared resources and then use this event for the "Start" condition.
Hidden/fixed: Hidden if the recorder mode is "Time To Stop"
- Stop: defines an event to stop the recorder. The user can choose any event among the list of defined events. By default only the Free run and Manual events are available. The user can define another event in the "Event Definition" shared resources and then use this event for the "Stop" condition.
Hidden/fixed: Hidden if the recorder mode is "Start To Time".
Note: If a trigger is used to stop the recorder, it doesn’t stop exactly at the event, one more block is recorded. It is useful in connected mode to stop the record on all the DSPs at the same time.
- Start delay: defines the delay between the start event date and the real beginning of the record. The user can enter a value between -131072/FeMax s and 360000 s (where FeMax is the largest sampling frequency of the recorded signals). The pre-trigger capability (Start Delay < 0) is very useful when the user wants to record the signal just before the start event.
Hidden/fixed: Hidden if the recorder mode is "Time To Stop".
- Stop delay: defines the delay between the stop event date and the real stop date. The user can enter a value between 0 s and 360000 s.
Hidden/fixed: Hidden if the recorder mode is "Start To Time".
Bandwidths
Used to set the bandwidth and sampling frequency of the signal to be recorded.
- Sampling: sampling frequency. The user can define up to 2 sampling frequencies among the available decimated values of the input setting sampling frequency.
- Bandwidth
 : this is the signal frequency bandwidth in the frequency domain. The frequency bandwidth is equal to the sampling frequency divided by 2.56.
The recorder supports up to 4 different bandwidths:
| Type | Range | Mode |
| FS 1 | 2.048 S/s to FSF | User define |
| FS 2 | 2.048 S/s to FSF | User define |
| Ext. Synch | Front-end Sampling Freq (FSF) | Automatic |
| Parametric inputs | 15 Hz | Fixed |
Note: once running the recorder, the other plug-in analyzer settings cannot be modified without restarting the record.
Autobandwidth
Principle
Autobandwith manages the analysis and recording bandwidths automatically.
The Inputs selection window allows the use of 2 different sampling rates for the dynamic inputs. It gathers inputs with the same physical quantity into groups, maintaining the same sampling into each group.
When inputs are associated with the analysis plug-in, it adjusts its analysis bandwidth to match the inputs ones. Mixing input bandwidths in one analysis plug-in will set its bandwidth to the lowest one.
Autobandwidth is set by default in the concerned plug-ins.
Recorder
When inputs are associated with the recorder, it adjusts the recording bandwidths channel by channel.
Deactivating the recorder's Autobandwidth allows managing the dynamic inputs sampling from the recorder. It is recommended to keep the recorder Autobandwidth active unless the recording signal must be a lower frequency than the analysis.
Arming
Arming of the recorder creates a backup of your record settings. Arming the recorder secures the record allowing an easy recovery of the data regardless of the cause of the end of the recording.
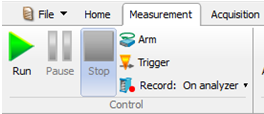
The recorder is armed automatically when pressing the RUN button. This operation may take a couple of seconds. It is possible to pre-arm the recorder allowing an immediate start of the recorder. This is available from the Measurement tab of the Vision interface:
- Unarmed record: the recorder is armed automatically by the start event. Then between the beginning of the start event and recording, there is a time ΔT corresponding to the arming (i.e. the backup of the record settings).
- Armed record: after the setup the recorder is armed (i.e. backup of the record settings allowing more security for you record). Then at any moment, when the recorder is armed, a ’Run event’ starts the record instantaneously (ΔT = 0).
Part file length
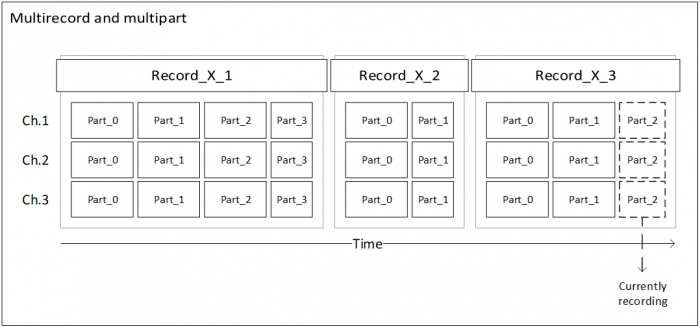
Since NVGate V17, Users have the flexibility to configure each time signal to include multiple records, with each record further divided into parts of customizable lengths.
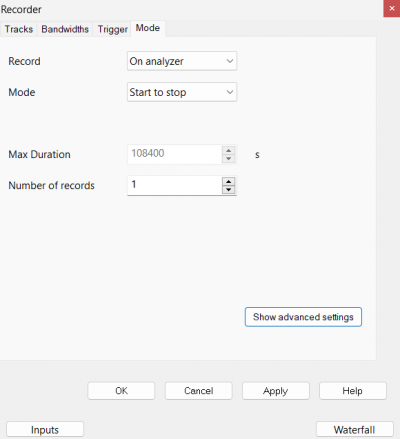
By default, the recorder is configured with a single record and the part length set to 'Auto' as below:
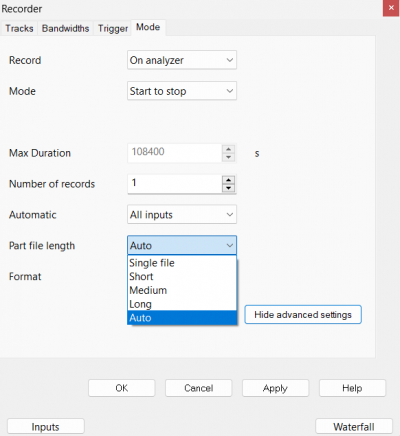
The duration of a part can be configured in the advanced settings as below:
- Single file: Only 1 part per signal.
- Short: Part length is set to 64 seconds.
- Medium: Part length is set to 640 seconds.
- Long: Part length is set to 1920 seconds.
- Auto: The part length depends on the recording mode:
- "Start to stop" mode: Part length is set to 640 seconds.
- "Start to time" mode:
- If duration is longer than 100 hours, then part length is set to 1920 seconds;
- If duration is between 10 and 100 hours, then part length is set to 640 seconds;
- If duration is between 5 and 10 hours, then part length is set to 128 seconds;
- If duration is less than 5 hours, then part length is set to 64 seconds.
- "Time to stop" mode: For duration of 1024 seconds or longer, the part length is set to 64 seconds. For shorter duration, the first power of 2 greater than duration/16 is selected. A minimum part length is enforced when the total record bandwidth is high. When the combined bandwidth of all recorded inputs exceeds 256 kHz, 512 kHz, or 1024 kHz, the minimum part length is set to 8, 16, or 32 seconds, respectively.
Recovering records
The recorded data benefits from specific safety tools that allow recovering the data in case of failure during the record.
There are 2 types of recovery:
- Manual recovery: if the initial project has been cancelled from your PC, or has been recorded with another PC, or if the project has been renamed. The recovering tools are available in the hard drive manager called from the Home tab/Disk group (Manage).
- Automatic recovery: in the case of an unexpected stop of the analyzer; i.e; during a recording, at the end of the recording or before saving the measurement.
During the next launch of NVGate, the Disc is scanned, and then all unsaved files will be recovered if the initial project is found in the local tree diagram. The recovered measurement will be renamed with the date of record.
This recovery type can handle multi records; the recover will be based on the shorter record.
If an unexpected stop occurred (power outage …), signals will be recovered and only few seconds will be lost, depending on the configuration of your record (sampling frequency, slow inputs).
For example, at 1 ch @ 51.2 kS/s, a maximum of 2.5 s could be lost.
If the mode ’Time to stop’ in the recorder is selected, unsaved files will not be recovered.
Progress Bar
Depending on the recorder mode the progress bar can be a normal, backward or ’snake’ type, with text indicating the state of the recording and the time of recorded data.

